On-Premises Only
The virtual Guardian appliance is the on-premises version of a Cloudhouse Guardian (Guardian) instance. The appliance works as a black-box, where only Guardian employees have access to modify its contents. For on-premises deployments, you are required to provision your own virtual Guardian appliance. Once it has been configured correctly, Guardian Support will collaborate with you to install and configure the application, see below for more information.
Port Requirements
The virtual appliance must be accessible over HTTPS port 443 for each of the following:
- Agents and/or
- Connection Managers.
- Guardian users – Anybody accessing the Guardian web console.
Note: Cloudhouse recommend that one Connection Manager is deployed for every 100 – 150 nodes intending to be scanned.
System Requirements
The following table describes the minimum appliance specifications that must be met.
| Nodes | Up to 1000 | 1001 to 5000 | 5001 to 10,000 | Over 10,000 |
|---|---|---|---|---|
| Central Processing Unit (CPU) | 8 CPU cores | 16 CPU cores | 32 CPU cores | Please contact your Technical Account Manager for more information. |
| Random-Access Memory (RAM) | 32 GB RAM | 64 GB RAM | 128 GB RAM | |
| Storage | Disk A: Default | Disk A: Default | Disk A: Default | |
| Disk B: 150 GB | Disk B: 500 GB | Disk B: 1 TB | ||
| Disk C: 150 GB | Disk C: 500 GB | Disk C: 1 TB | ||
| Disk D: 100 GB | Disk D: 100 GB | Disk D: 100 GB | ||
| Disk E: 100 GB | Disk E: 100 GB | Disk E: 100 GB |
Procedure
For on-premises deployments, you will receive the Guardian appliance as an Open Virtual Appliance (OVA). Once set up, the appliance runs as a secure, self-contained virtual machine. For security purposes, only members of the Guardian Team can access and modify the internal configurations of the appliance. The following process describes how to provision, import, and configure your virtual Guardian appliance.
Note: If you require a different format to the standard OVA, please contact your Guardian Representative for more information.
Dependencies
To begin the process of configuring your virtual appliance, the following dependencies must be met:
- Appliance format agreed – By default, this is an OVA file.
- Appliance download link received – If you have not received a link to download your virtual appliance, contact your Technical Account Manager.
- Port requirements are met.
- System requirements are met.
Download and Import
First, you are required to download the virtual appliance and then import it into your VMWare environment by following the steps described below:
- Download the virtual appliance using the link provided by Cloudhouse.
- Import the file into your VMWare environment.
- Close your virtual machine and then reboot it. By rebooting your machine, DHCP will automatically obtain an IP address for your virtual appliance. For more information, see Dynamic (DHCP) Configuration.
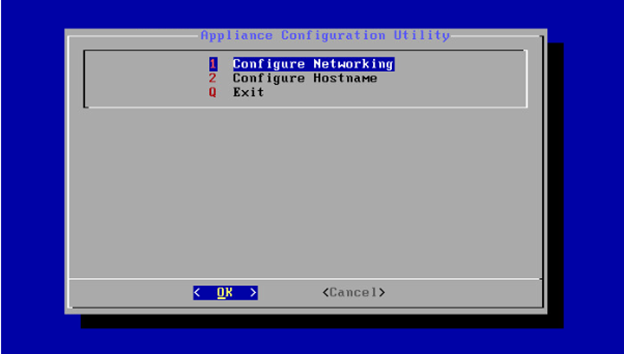
- Open the Appliance Configuration Utility dialog by clicking Alt + F9 on your keyboard for Windows machines. Alternatively, click fn + Alt + F9 for Macs.
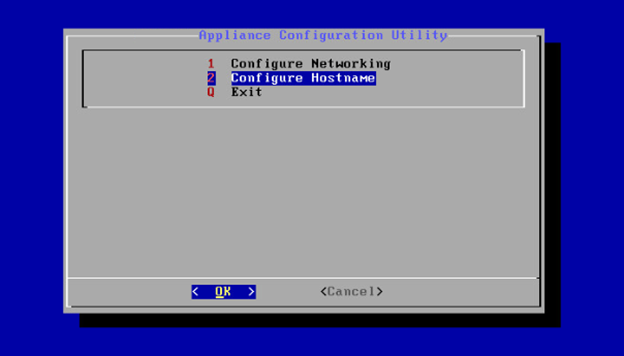
The Appliance Configuration Utility dialog is displayed with the following options:
- Configure Networking
- Configure Hostname
- Exit.
Here, you can set up advanced network configurations for your virtual appliance, see below for more information.
Configure Networking
Next, you are required to configure the networking configuration for your virtual appliance. Once completed, the virtual appliance must be allocated an IP address. This can be achieved via Dynamic [...] Configuration or Static Configuration, see below for more information.
Configure the network for your virtual appliance by following the steps described below:
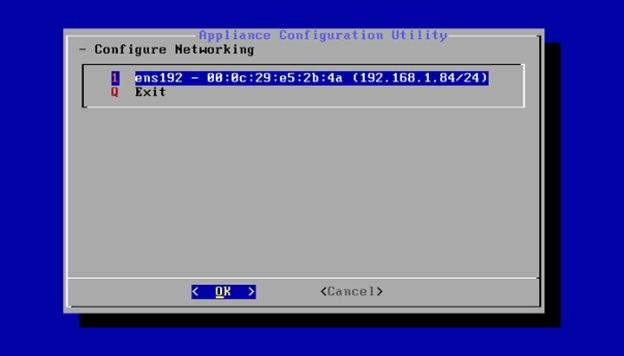
- In the Appliance Configuration Utility dialog, click to Configure Networking.
- The Configure Networking screen is displayed. There is only supported configuration for this network. Select the only network interface and then click OK to proceed.
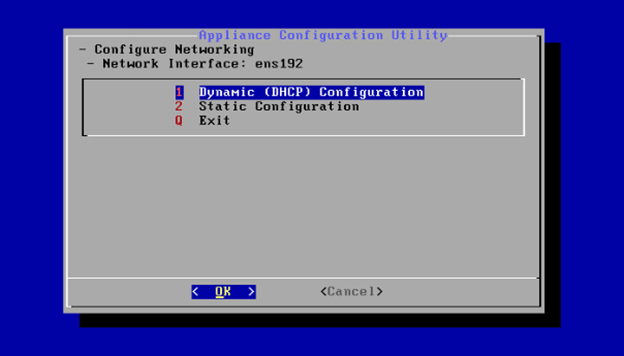
The Network Interface screen is displayed. Here, the following options are displayed:
| Option | Description |
|---|---|
| Dynamic (DHCP) Configuration button |
Click to begin the process of dynamic IP allocation. |
| Static Configuration button |
Click to begin the process of static IP allocation. |
| Exit button |
Click to exit the Configure Networking screen. |
For more information on how to allocate an IP address to your virtual appliance, see Dynamic (DHCP) Configuration and Static Configuration below.
Dynamic (DHCP) Configuration
By default, DHCP is used to allocate an IP address to your virtual appliance. This process occurs upon the first reboot of your virtual machine and does not require any manual configuration to connect to your local devices or gain access to the Web.
To complete the process of dynamic IP allocation, follow the steps described below:
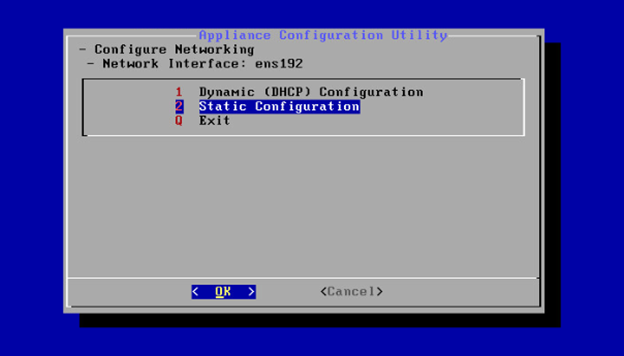
- On the Network Interface screen, select Dynamic (DHCP) Configuration and then click OK to proceed. At this point, your virtual appliance will already have been allocated an IP address.
- Next, you are required to locate the IP address for your virtual appliance. Return to the Configure Networking screen and take note of the IP address for future use. The address is included in the network interface name. For example, 'ens192 - 00:0c:29:e5:2b:4a (192.168.1.84/24)'.

It is also possible to allocate a static IP address to your virtual appliance, see below for more information.
Static Configuration
A static IP address does not change over time unless it is changed manually. To allocate your virtual appliance an IP address via Static Configuration, you must manually configure each value by following the steps described below:
- On the Network Interface screen, select Static Configuration and then click OK to proceed.
- The Static Configuration screen is displayed.
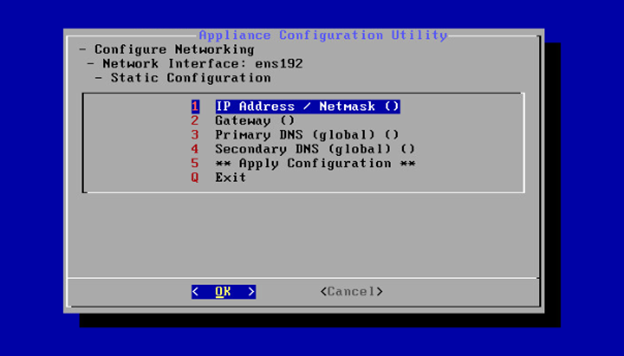
Here, the following values are displayed:
| Option | Description |
|---|---|
| IP Address / Netmask field |
The IP address that is to be allocated to the virtual appliance. The CIDR suffix is mandatory. For example, '192.168.1.84/24'. |
| Gateway field |
The address for the gateway that the virtual appliance will use. |
| Primary DNS (global) field |
The primary DNS server that the virtual appliance will use for name resolution. |
| Secondary DNS (global) field |
The secondary DNS server that the virtual appliance will use for name resolution. |
| Apply Configuration button |
Click to save your Static Configuration settings once complete. |
| Exit button |
Click to exit the Static Configuration screen. |
- Once each of the fields have been populated with the correct values, click to Apply Configuration and save your Static Configuration settings.
- Cloudhouse also recommend that you reset your virtual appliance through VMWare to ensure that it uses the correct network configuration.
Configure Hostname
Finally, you are required to set the hostname for your virtual appliance. A hostname is used to distinguish devices within your local network and will be used by the appliance when it is registered with the Guardian website.
Tip: Alternatively, once the IP address of the Connection Manager has been set, you can configure the hostname via the Connection Manager's web interface. In your Web browser, enter the IP address followed by /api/login. For example, 192.168.140.208/api/login. The Login with your API Key page is displayed. Enter the required information in the fields provided..png)
Configure the hostname for your virtual appliance by following the steps described below:
- In the Appliance Configuration Utility dialog, click to Configure Hostname.
- The Configure Hostname screen is displayed.
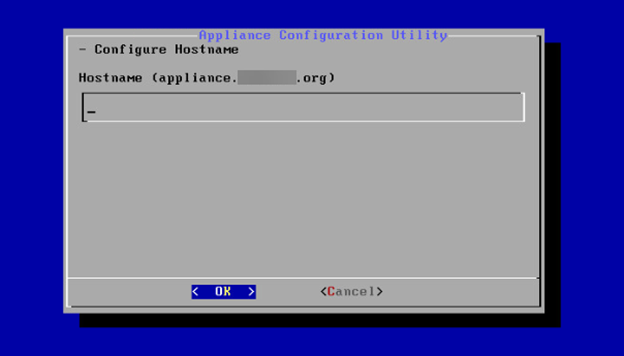
Here, the following field is displayed:
| Field | Description |
|---|---|
| Hostname |
The hostname for your virtual appliance. For example, once your appliance is registered with the Guardian website, the hostname will appear like so: 'Appliance.Hostname.org'/ |
- Once the hostname has been set, click OK to save your changes.
- Then, you can exit out of the Appliance Configuration Utility dialog.
Once you have completed each of the steps described above, please contact your Guardian Representative. They will then be able to work with you to complete the appliance provisioning.